Hey people, in this article, we’ll see how to configure TP -Link TL-WR740N (preferably old one) as repeater to extend your main WI-FI signal in your house.
Lets get into basics real quick.
What’s a repeater ?
Definition : A WiFi repeater or extender is used to extend the coverage area of your Wi-Fi network. It works by receiving your existing Wi-Fi signal, amplifying it and then transmitting the boosted signal.
Steps on secondary router :
- Do a factory reset of your secondary router. You can refer https://youtu.be/4AkkPRE9ZBM">this video for how-to steps.
- Once the router is up and running, connect to it wirelessly / through LAN cable.
- Go to admin console by typing this IP address in browser URL :
192.168.0.1with credentials , username :adminpassword :admin( super secure :D ) - Lets first change the IP address of this router to something else rather than the default one as later this IP can cause IP allocation conflict due to DHCP set in primary router.
- To to that , lets go to Network -> LAN -> IP address and change it to something like
192.168.1.100.and hitSave. ( you can change it to almost any IP you like in this subnet)

Do a reboot of the router and connect back to router console using the new IP in browser URL i.e. in my case
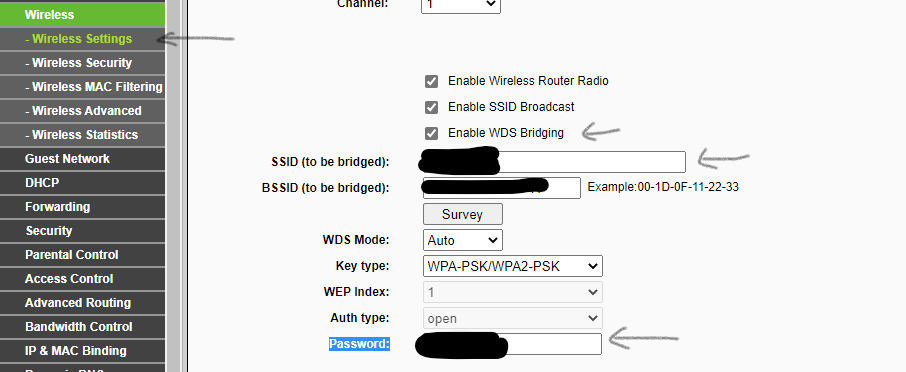
192.168.1.100or the IP given by you.Lets configure the repeater mode. To do that, go to
Wireless -> Enable WDS Bridging.Click on Survey and select the WIFI name which you want to repeat.
Type the password for that in Password field and hit
Save. Later you may get alert on switching the repeater to be in same Wi-Fi channel as main router, select ok to that pop-up.

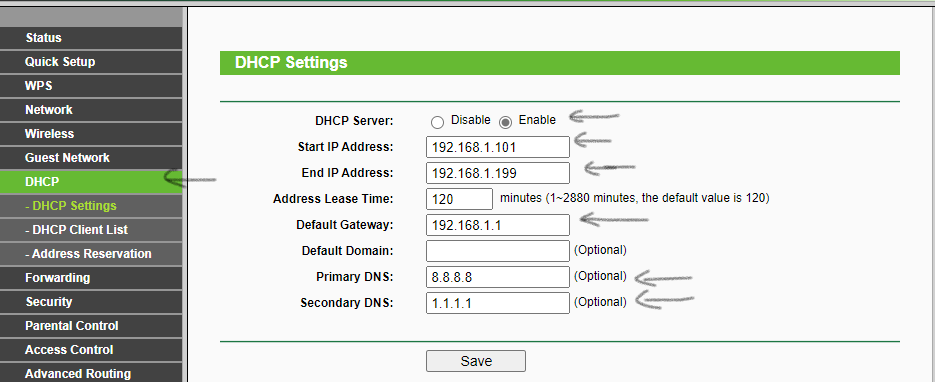
- Next thing would be to setup DHCP of the router.
I’ll explain a bit here regarding the problem I faced. According to YouTube tutorials and articles out there, we need to disable the DHCP option in secondary router.
What I faced after that is I cant connect any device to that router later as DHCP is disabled, the router wont be able to assign any IP address to any device asking for connection. So your device will be struck in “Obtaining IP address”.
So I found out the below trick and its working brilliantly for me.

- Ok, lets through the settings one by one,
DHCP Server : Keep it Enable
Start IP Address: Enter : 192.168.1.101 OR the +1 IP of the assigned IP to your router. i.e
If you gave 192.168.1.10 to your router, mention here 192.168.1.11
End IP Address: : Enter 192.168.1.199 or the IP range limit you need. I mentioned here 98 (199 - 101) Address limit assuming my number of devices wont exceed 98 devices :D
[ Follow the start IP address logic if you mentioned any alternate IP address to router. ]
Address Lease Time: Keep the default value.
Default Gateway: Here, enter the IP address of your primary router. You can mostly find out by seeing the backside of your primary router.
Else, you can run the below command via cmd to get the value ( after connecting to primary router) :
ipconfig /all | findstr Gateway<br />Default Gateway . . . . . . . . . : 192.168.1.1
Default Domain: Keep the default value i.e. empty.
Primary DNS: You can mention the DNS resolver address. This is optional and same for below one also. if none is mentioned, DNS resolver given by ISP is used. which is not a good solution from privacy perspective. You can use Google Public DNS ( 8.8.8.8) , Quad DNS,(9.9.9.9) Cloud flare DNS (1.1.1.1) here.
Secondary DNS: This value corresponds to what resolver to use if the request is not resolved by the first DNS. Its good to mention different service to ensure high reliability.
That’s it. hit Save and do a reboot of the server to get new changes.
Note : there’s a high change you wont be able to connect to your repeater later if you’re in a Wi-Fi crowded place i.e. you are surrounded by lot of WIFI. When there are lot of Wifi nearby the router tries to get to channel which is less crowded.
But in repeater mode, both repeater and main router needs to be in same Wi-Fi channel. So I would highly advice you to go to your primary router set the Wi-Fi to a particular channel and keep the same channel in repeater also. rather than the default setting : Auto.