Hey all! It’s been a long time since I haven’t written a blog about Kubernetes. So I was wandering in r/devops in Reddit and saw a post where the digital ocean is hosting a Kubernetes challenge and guess what they’re giving away free credits of $120 to try it out free!!!
This blog is written in multiple sections from steps to apply to steps to deploy your app in Digital Ocean Kubernetes via CI/CD. Let’s get started!
Challenge Details
- Link of the challenge page Here
- Pick one challenge from the list mention in above link based on your knowledge.
- Create a GitHub or GitLab repo for your project
- Fill out the code challenge form to get DigitalOcean credits for your project
- Join the #kubernetes-challenge channel in the DigitalOcean Deploy Discord
- Complete your challenge
- Write about what you’ve built and share it on a blog or in your project README.
- Make a pull request against the Kubernetes Challenge Github Repo with information about your project
- Let them know you’ve completed your challenge by filling out this form
Now that we’ve applied let’s take a look at one of the challenges I chose :
Deploy a GitOps CI/CD implementation
GitOps is the (only) way automate deployment pipelines for Kubernetes environments in 2022, and ArgoCD is currently one of the leading player. Install it to create a CI/CD solution, using GH Actions for actual image building.
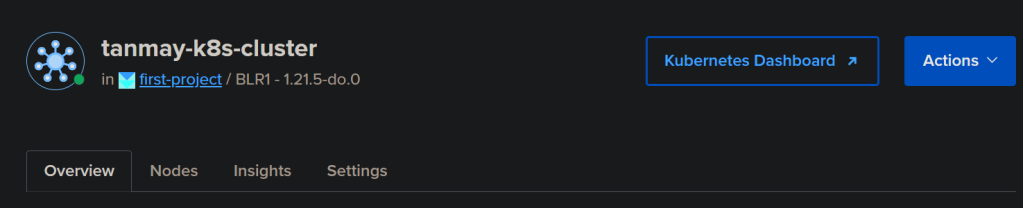
Cluster Creation
- Sign in to your DO console.
- Click on NEW button and create a Kubernetes cluster with default values.
- You can customize the location of cluster nearest to your location to avoid altency issues to API server.
- Once you submit, it’ll take around 10-15 min for the worker nodes and API server to become ready.
- Click on the Actions button and download the kubeconfig file.

- Once you download, install kubectl binary by following steps in the Getting started section of *overview *tab.
- Once, kubectl in installed in your local, you can save / move the config file downloaded to your
~/.kube/configlocation. - Now, you can connect to your API server, test it by running :
kubectl get node -o wide

Project setup
- Clone this repository using below command :
git clone https://github.com/tanmay-bhat/DigitalOcean-Kubernetes-Challenge-argoCD
This project contains below:
- go app
- Dockerfile
- github actions file ( CI)
- Kubernetes manifest files
Let’s Look mainly kustomize/base :
- Here, Deployment.yaml file contains the deployment resource YAML file.
containers:
    - image: registry.digitalocean.com/tanmaybhat/saymyname
        name: saymyname
        ports:
        - name: http
            containerPort: 8080
    imagePullSecrets:
    - name: tanmaybhat
Notice the image registry I’m using is the Digital Ocean registry itself and not the mostly used Docker Hub.
The ImagePullSecrets has a name: Tanmay Bhat. This is the Kubernetes secret which has the Digital Ocean registry credentials which we will use to pull the image.
Now let’s look at our Github actions config file :
name: Go

on:
  push:
    branches: [ main ]
    tags:
      - 'v*.*.*'

jobs:
  build:
    name: Build
    runs-on: ubuntu-latest

    steps:
    - name: Set up Go 1.x
      uses: actions/setup-go@v2
      with:
        go-version: ^1.14

    - name: Check out code
      uses: actions/checkout@v2

    - name: Extract Git Tag
      run: echo "GIT_TAG=${GITHUB_REF/refs\/tags\//}" >> $GITHUB_ENV

    - name: Login to Digitalocean
      uses: docker/login-action@v1
      with:
        registry: registry.digitalocean.com
        username: ${{ secrets.DIGITAL_OCEAN_TOKEN }}
        password: ${{ secrets.DIGITAL_OCEAN_TOKEN }}


    - name: push image to digitalocean
      run: |
        docker build -t registry.digitalocean.com/tanmaybhat/saymyname:${{ env.GIT_TAG }} .
        docker push registry.digitalocean.com/tanmaybhat/saymyname:${{ env.GIT_TAG }}
  deploy:
    name: Deploy
    runs-on: ubuntu-latest
    needs: build

    steps:
    - name: Check out code
      uses: actions/checkout@v2

    - name: Extract Git Tag
      run: echo "GIT_TAG=${GITHUB_REF/refs\/tags\//}" >> $GITHUB_ENV

    - name: update image tag in manifest
      uses: imranismail/setup-kustomize@v1
    - run: |
          cd kustomize/base
          kustomize edit set image registry.digitalocean.com/tanmaybhat/saymyname:${{ env.GIT_TAG }}

    - name: Commit files
      run: |
        git config --local user.email "action@github.com"
        git config --local user.name "GitHub Action"
        git commit -am "update image tag to ${{ env.GIT_TAG }}"
    - name: Push changes
      uses: ad-m/github-push-action@master
      with:
        github_token: ${{ secrets.GITHUB_TOKEN }}
I’m gonna explain the above section since the main goal of this article is to do CI/CD :
- The on section says trigger this piepline if the chnages has been pushed to **Main branch with a tag in format : vx.x.x ( i.e v1.0.0 etc)
- On each tag push, pipeline will run 2 jobs. Build and Deploy.
- In Build section, the follwing steps will run on ubuntu image.
- Check out code step uses pre-build action
actions/checkout@v2to clone current repository into the piepline container i.e ubuntu. - Extract Git Tag is used to get the latest tag pusued to main branch and store it in th environmental variable GIT_TAG.
- In Login to Digitalocean, since we need to push our build docker images to a private registry like Digital Ocean, I’m using docker login action to auttenticate to the DO registry.
- In push image to digitalocean, I’m buidling the docker image and tagging it to latest pushed tag version and pushing to my registry.
- Next comes, the Deploy section. here again I’m using ubuntu as base image and again getting the repository from main branch and extracting tag version from the repositiry.
- Once that is done, I’ll use a tool called Kustomize to update my manifest file’s docker image tag to the latest tag version.
- If you’re using helm charts only but not kustomize with Helm, you need to use Sed command and update the image tag in manifest file ( deployment.yaml).
- Later, I’m doing the commit of latest tag edit and pushing the changes back to my repo.
To sum up, what the exact pipeline does whenever a new tag is pushed to main branch :
- clone the repository, build the docker image, tag it and push it to registry.
- update the tag in manifest file and push it back to gthe repository.
You might have this question, Tanmay, this is just CI, where’s CD ? well, that’s the magic ArgoCD solves for us.
ArgoCD
- Setup ArgoCD by running the below commands :
kubectl create namespace argocd
kubectl apply -n argocd -f https://raw.githubusercontent.com/argoproj/argo-cd/stable/manifests/install.yaml
- Once done, you can verify its running status by running the command

- Next step is to retrieve the password of argocd. For that, run :
kubectl -n argocd get secret argocd-initial-admin-secret -o jsonpath="{.data.password}" | base64 -d
- By default argocd service type will be ClusterIP. That means you cant access argocd outside of your cluster. So, Let’s change that to LoadBalancer by running :
kubectl patch svc argocd-server -n argocd -p '{"spec": {"type": "LoadBalancer"}}'
- Now, wait for couple more minutes for LoadBalancer to start in Digital Ocean and get the endpoint of it by running :

- Open the external IP in your browser and voila, you should see argocd UI login page. Login with username: admin password got from step 3.
ArgoCD Configuration
- Once logged in to ArgoCD UI, click on new app and set the below values:
application name : demo-argocd
Project : default
Sync Policy : Automatic
Repository URL : <GITHUB REPO URL OF YOUR PROJECT>
Rivision : HEAD
Path : kustomize/base
Destination Cluster : https://kubernetes.default.svc
Namespace : default
Click create and see your app glowing in your cluster.
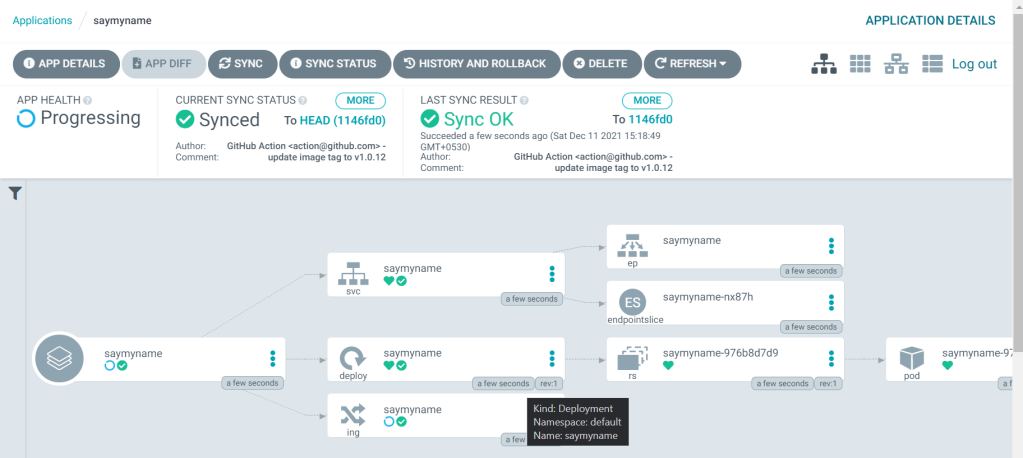
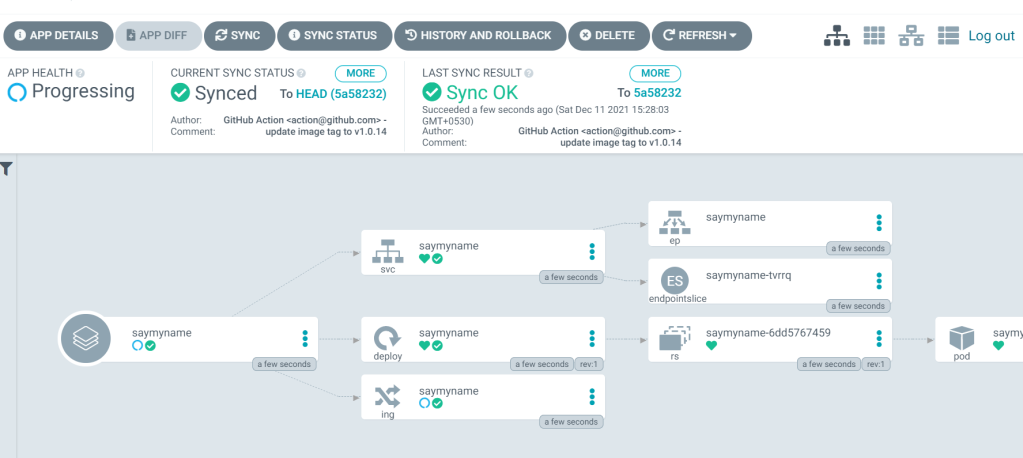
the ArgoCD magic here is that, it watches for any new changes to your repo every 3 minutes ( default ) and new changes will be auto-applied in your cluster.
See the comment that says: update the tag to v1.0.12 ? that was my last commit. If a new tag is committed, here’s how it’s gonna update and look
Conclusion
I found DOKS to be extreme easy to set up and straightforward. From click to integrate Registry to a Kubernetes cluster, easy cluster creation and scaling up.